
Filipino Puto with Cheese Free Crochet Amigurumi Pattern
PUTO WITH CHEESE AMIGURUMI CROCHET FREE PATTERN

What is a puto with cheese, you may ask?
Ah, puto. One of the standard Filipino desserts that you can
find at almost every single big Filipino party. Puto, or Filipino steamed rice
cake, is commonly made from rice flour and steamed to distinguish it from other
Filipino desserts. It can be topped with cheese, butter, grated coconut or
eaten plain as a side to some savoury dishes. Some modern variations are
flavored with ube or pandan.
I have fond memories of my Mamang (Mamang is what we called
our grandmother on my mother’s side) stacking huge steamers full to the brim
with cheese puto. I would help her out by unstacking all the little paper
cupcake liners for her into the old foil cups she reused every time she made
them.
Although I haven’t quite mastered making puto with cheese on
my own, creating this amigurumi puto pattern has certainly reminded me so much
of my Mamang, who is now in the Philippines. You can customize it to be an ube
color (as shown here) or even a light green pandan color to complete the
collection!
This post may contain affiliate links. If you click on a link and purchase the item, I will receive a small commission at no extra cost to you. Thank you for supporting this blog!
All writing content/patterns are the intellectual property of Chantel Parson, the creator of Creative Care Corner.
If you wish to share this pattern, you may link to this pattern but please DO NOT reprint it on your site. You may keep a copy for your own personal use but please DO NOT sell the pattern itself or distribute it,
You may sell products made from this pattern but please clearly credit the design to Creative Care Corner and link it to my website creativecarecorner.blogspot.com
Please tag @creativecarecorner when posting it to show me how yours turned out!
Here’s what you’ll need:
Skill Level: Easy
Basic sewing and amigurumi knowledge of working in the round recommended.
Dimensions:
Approximately 2 inches height x 2.4 inches width (5 cm x 6 cm)
Abbreviations (in US terms)
sl st - Slip stitch
inc - increase
dec - decrease (I use the invisible decrease method)
sc - single crochet
hdc - half double crochet
BLO - back loops only
* * - repeat instruction
FO - finish off
Notes:
This pattern is worked continuously in the round
This pattern is written in US terms
Example photos for some steps will be found BELOW said step.
I place my stitch marker in the FIRST STITCH of each round.
Let’s Start!
R1: 6 sc into a magic ring (6)
R2: *inc* around (12)
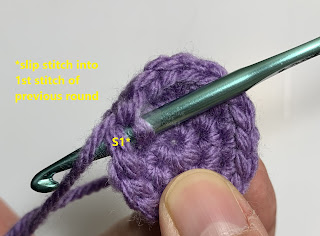
R3: *sc, inc* around (18) *18th stitch – sl st into the 1st stitch of the previous round first, then start R4 in that same stitch


R4: sc around BLO (18)

R5 and R6: sc around (18)
R7: *2 sc, inc* around (24)
R8: sc around (24)
R9: *3 sc, inc* around (30) *30th stitch – sl st into the 1st stitch of the previous round first, then start R10 in that same stitch


R10: sc around BLO (30)
R11: sc around (30)
>place safety eyes between row 6 and 7, 3 stitches apart and begin stuffing<

R12: *3sc, dc* around (24)
R13: *2 sc, dc* around (18)
>finish stuffing<
R14: *sc, dc* around (12)
Fasten off, leaving a long tail for sewing. Sew closed by weaving the tail into the front loops of the last round all the way around and pull closed.


Cheese (Yellow Yarn)
Chain 11
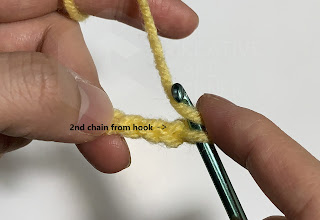


Chain 1, turn work and HDC across (Make 2 rows, 10
stitches long)
Fasten off, leave long tail to sew onto top of puto
Assembly

Sew the yellow cheese piece onto the top of the puto. You can position it as you wish. I placed mine in a diagonal across the top because that’s how my grandmother made her puto.


Embroider a small ‘v’ for the mouth.
Embroider one stitch of pink under each eye for ‘blushing cheeks’.
Optional: if you want to add a
keychain to your piece, make sure to leave enough yellow yarn tail to create a
“loop stitch” on top of the cheese to attach the keyring to.


And there you go, your own cute little puto with cheese, minus the calories! I hope you enjoyed this pattern and can’t wait to see your version of it!

Here are some examples of products that I used:


Comments
Post a Comment